Tuesday, August 2, 2011
Cute and Organized!
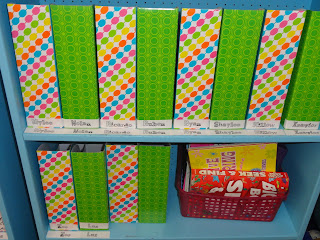
Today I finished my Daily 5 book box display. I have always wanted to use book boxes but couldn't justify the expense of magazine file boxes. The cheapest I've seen them was $2.50 each. Times that by 26 kiddos and well, you get the idea. So you can imagine my excitement when I found these cuties in the Target dollar spot. Yay!! I picked up 30 of them and ran back to school eager to put them in their chosen spots. I decided to organize them all in a pattern because it's prettier that way and I love me a pretty display! BUT, you all know what happens as soon as the kiddos get a hold of them. They will be shoved back onto the shelf in any old order. To keep them in their place I labeled the shelf with an identical name tag that's on the book box. Now all the kiddos have to do is find their name and my pretty display will stay all year long!
Monday, August 1, 2011
Birthday Fun!
I figure I would post twice today due to my foreseen absence from the blog world at some point this year. Yesterday I finished my birthday board. I am very proud of this board considering it is 100% MY IDEA! That doesn't happen very often folks. I am queen of stalking other teachers on the Internet and stealing their ideas. Now I do have to put a disclaimer out there. I didn't search FOREVER on this one like I normally do. So there could quite possibly be another birthday board somewhere similar to mine. For now I will claim it as my own (it makes me feel better!)
Are you ready?
Once again my camera (and the glare from the shiny bags) don't do the actual product any justice. Basically I used dollar store bags (3 for a dollar at Dollar Tree), curly cue present decorations (4 for a dollar) and sparkly foam letters (Walmart- $5 a bag but I've used these for tons of projects!) on the front of the bags for the months. Then I took some leftover foam bookmarks that I had and made gift bag tags. On the tags (the pics don't show this well) I used small foam letters to put on the names of the birthday kids on each tag. I hot glued the whole mess up and stepped back to admire my work. Please don't tell me if it's not as cute as I think it is!
Labels:
Birthday,
Bulletin Boards,
Cute Ideas
Busy as a Beaver!!!
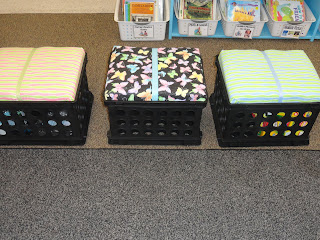
I love Back to School time! It gives me a chance to start fresh and complete fun projects to cutesy up my room. I told you about the adorable crate seats that I found on Pinterest. Well here is my finished product thanks to the hard work of my mom and husband! Once we had the wood cut these seriously took us 30 minutes to put together.
My camera washed out the colors. The one on the left is pink and green striped and the one on the right is the same fabric only blue and green striped. The butterfly fabric matches my chair pockets.
I love how these turned out and they were super easy! I could see these in a playroom or a child's bedroom. They bonus is they double as storage which I was in dire need of in my classroom! Here's what you need:
- Crate- Target has cute colors right now for $3 (it must be the file folder kind with the lip)
- Foam- This can be the expensive part if you're not careful. I used a 50% off coupon at Joann's and paid $15 which was enough for 6.
- Plywood- My wood working husband already had this on hand so no cost to me.
- Fabric- About a half yard per seat.
- Ribbon- $1.97 at Walmart. One roll for 3 seats.
- Spray Glue- I think I spent 3 or 4 dollars at Walmart.
Directions: Measure the plywood and cut so that it will sit inside on the lip. Cut the foam using the same measurements (use an electric knife- so fast!). Spray the glue onto the plywood and place your foam on top. Let this sit to dry for about 30 minutes. Wrap the fabric around the foam covered board, pull tight and staple to the back with a staple gun. We wrapped the corners like we would a present. Once you have the fabric on, measure a piece of ribbon to go around the cushion and staple it into the back. Make sure the ribbon is not too loose, but loose enough to get your hand under it so that you can easily pull the cushion off of the crate when you need to. Voila! That's it!
Subscribe to:
Comments (Atom)










.JPG)


